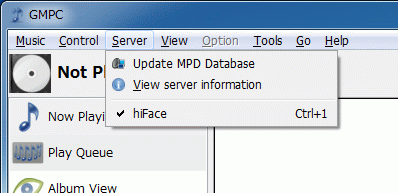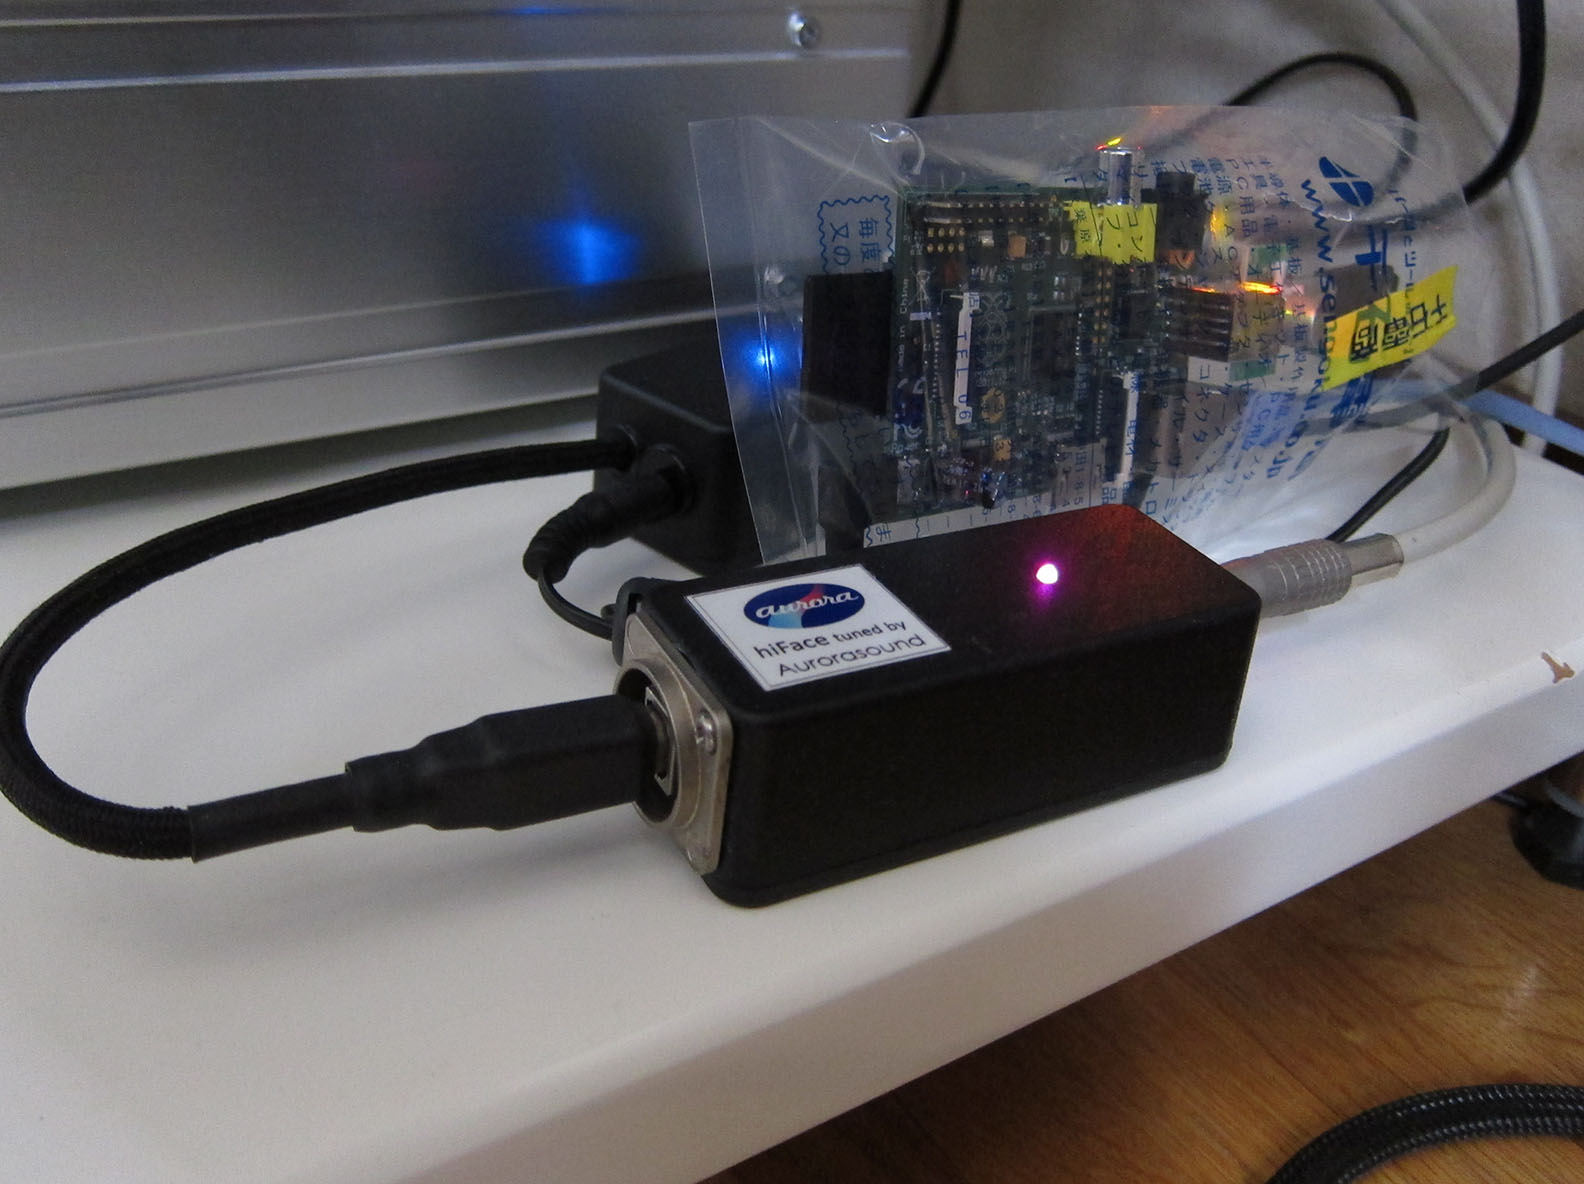
筆者宅のシンプル(≒手抜き)PCオーディオシステム
NAS=>LAN>=Raspberry Pi=>USB>=hiFace Pro=>同軸>=SONY TA-F501=>SP>=ELAC FS247=>筆者
初出:2013/04/10
改訂:2015/02/11
Raspberry Pi(Raspbian "wheezy")は、M2TECHの初代hiFace(白)やhiFaceEvoに標準対応していません。対応させるためには、公式の専用ドライバを手動で作成してインストールする必要があります。以下にその手順を記載します。初歩的なLinuxの知識が必要ですが、Raspberry Piのユーザーならば何とかなるでしょう。
筆者宅のシンプル(≒手抜き)PCオーディオシステム
NAS=>LAN>=Raspberry Pi=>USB>=hiFace Pro=>同軸>=SONY TA-F501=>SP>=ELAC FS247=>筆者
pi@raspberrypi:~$ su -
root@raspberrypi:~# apt-get install build-essential
※既に最新パッケージが入っている場合は、インストールは行われません。
root@raspberrypi:~# apt-get install git
※既に最新パッケージが入っている場合は、インストールは行われません。
root@raspberrypi:~# cd /usr/src
root@raspberrypi:/usr/src#
root@raspberrypi:/usr/src# uname -a
Linux raspberrypi 3.12.35+ #730 PREEMPT Fri Dec 19 18:31:24 GMT 2014 armv6l GNU/Linux
※unameして、カーネルのバージョンを調べます。
root@raspberrypi:/usr/src# wget https://github.com/raspberrypi/linux/archive/rpi-3.12.y.tar.gz
root@raspberrypi:/usr/src# ls
rpi-3.12.y.tar.gz
※今回は「3.12.35」なので、ソースコードもそれに合わせたバージョンを取得します。
root@raspberrypi:/usr/src# tar zxvf rpi-3.12.y.tar.gz
root@raspberrypi:/usr/src# ls
linux-rpi-3.12.y  rpi-3.12.y.tar.gz
※解凍には数分かかります。
root@raspberrypi:/usr/src# wget https://raw.githubusercontent.com/raspberrypi/firmware/2f9828c4577a858571b76eef3f7e1d3ff7ac1ba9/extra/Module.symvers
root@raspberrypi:/usr/src# ls
linux-rpi-3.12.y  Module.symvers  rpi-3.12.y.tar.gz
root@raspberrypi:/usr/src# git clone git://github.com/panicking/snd-usb-asyncaudio.git
root@raspberrypi:/usr/src# ls
linux-rpi-3.12.y  Module.symvers  rpi-3.12.y.tar.gz  snd-usb-asyncaudio
root@raspberrypi:/usr/src# ls /lib/modules
3.12.35+
root@raspberrypi:/usr/src# ln -s /usr/src/linux-rpi-3.12.y /lib/modules/3.12.35+/build
root@raspberrypi:/usr/src# ls /lib/modules/3.12.35+/build
arch     Documentation  init     lib          README          sound
block    drivers        ipc      MAINTAINERS  REPORTING-BUGS  tools
COPYING  firmware       Kbuild   Makefile     samples         usr
CREDITS  fs             Kconfig  mm           scripts         virt
crypto   include        kernel   net          security
root@raspberrypi:/usr/src# cd linux-rpi-3.12.y/
root@raspberrypi:/usr/src/linux-rpi-3.12.y#
root@raspberrypi:/usr/src/linux-rpi-3.12.y# zcat /proc/config.gz > .config
root@raspberrypi:/usr/src/linux-rpi-3.12.y# cp /usr/src/Module.symvers ./
root@raspberrypi:/usr/src/linux-rpi-3.12.y# ls -a
.        CREDITS        .gitignore  kernel       Module.symvers  security
..       crypto         include     lib          net             sound
arch     Documentation  init        .mailmap     README          tools
block    drivers        ipc         MAINTAINERS  REPORTING-BUGS  usr
.config  firmware       Kbuild      Makefile     samples         virt
COPYING  fs             Kconfig     mm           scripts
※これをしないと、hifaceモジュール組み込み時にエラーになるので、必ず行ってください(「CONFIG_MODVERSIONS」対策)。
root@raspberrypi:/usr/src/linux-rpi-3.12.y# make oldconfig
root@raspberrypi:/usr/src/linux-rpi-3.12.y# make prepare
root@raspberrypi:/usr/src/linux-rpi-3.12.y# make modules_prepare KERNELRELEASE=$(uname -r)
root@raspberrypi:/usr/src/linux-rpi-3.12.y# cat include/generated/utsrelease.h
#define UTS_RELEASE "3.12.35+"
※最後に「cat include/generated/utsrelease.h」を行って、「#define UTS_RELEASE "3.12.35+"」と表示させていますが、「"3.12.35+"」のところが「uname -r」コマンドの結果と一致していればOKです(vermagic対策)。
root@raspberrypi:/usr/src/linux-rpi-3.12.y# cd ../snd-usb-asyncaudio/
root@raspberrypi:/usr/src/snd-usb-asyncaudio# make clean
root@raspberrypi:/usr/src/snd-usb-asyncaudio# ls
chip.c  chip.h  dkms.conf  Makefile  pcm.c  pcm.h  test-rates.sh
root@raspberrypi:/usr/src/snd-usb-asyncaudio# make
make -C /lib/modules/3.12.35+/build SUBDIRS=/usr/src/snd-usb-asyncaudio modules
make[1]: Entering directory `/usr/src/linux-rpi-3.12.y'
  CC [M]  /usr/src/snd-usb-asyncaudio/chip.o
  CC [M]  /usr/src/snd-usb-asyncaudio/pcm.o
  LD [M]  /usr/src/snd-usb-asyncaudio/snd-usb-hiface.o
  Building modules, stage 2.
  MODPOST 1 modules
  CC      /usr/src/snd-usb-asyncaudio/snd-usb-hiface.mod.o
  LD [M]  /usr/src/snd-usb-asyncaudio/snd-usb-hiface.ko
make[1]: Leaving directory `/usr/src/linux-rpi-3.12.y'
root@raspberrypi:/usr/src/snd-usb-asyncaudio#
root@raspberrypi:/usr/src/snd-usb-asyncaudio# ls
chip.c     Makefile        pcm.h                 snd-usb-hiface.mod.o
chip.h     modules.order   pcm.o                 snd-usb-hiface.o
chip.o     Module.symvers  snd-usb-hiface.ko     test-rates.sh
dkms.conf  pcm.c           snd-usb-hiface.mod.c
※「snd-usb-hiface.ko」が出来ていれば、コンパイル成功です。
root@raspberrypi:/usr/src/snd-usb-asyncaudio# modinfo snd-usb-hiface.ko
filename:       /usr/src/snd-usb-asyncaudio/snd-usb-hiface.ko
license:        GPL v2
description:    M2Tech hiFace USB-SPDIF audio driver
author:         Antonio Ospite
author:         Michael Trimarchi
srcversion:     924B0E1234B14D4BC177996
alias:          usb:v25C6p9002d*dc*dsc*dp*ic*isc*ip*in*
(中略)
alias:          usb:v04B4p0384d*dc*dsc*dp*ic*isc*ip*in*
depends:        snd-pcm,snd
vermagic:       3.12.35+ preempt mod_unload modversions ARMv6
parm:           index:Index value for hiFace soundcard. (array of int)
parm:           id:ID string for hiFace soundcard. (array of charp)
parm:           enable:Enable hiFace soundcard. (array of bool)
root@raspberrypi:/usr/src/snd-usb-asyncaudio# insmod snd-usb-hiface.ko
※ここで「Error: could not insert module snd-usb-hiface.ko: Invalid module format」と表示された場合は、ドライバ情報を確認してください。
root@raspberrypi:/usr/src/snd-usb-asyncaudio# lsmod
Module                  Size  Used by
snd_usb_hiface          8614  0
snd_bcm2835            15846  0
snd_pcm                77560  2 snd_bcm2835,snd_usb_hiface
(後略)
※「snd_usb_hiface」が表示されればOKです。
root@raspberrypi:/usr/src/snd-usb-asyncaudio# poweroff
root@raspberrypi:~# cd /usr/src/snd-usb-asyncaudio
root@raspberrypi:/usr/src/snd-usb-asyncaudio# insmod snd-usb-hiface.ko
root@raspberrypi:/usr/src/snd-usb-asyncaudio# aplay -l
card 0: ALSA [bcm2835 ALSA], device 0: bcm2835 ALSA [bcm2835 ALSA]
  Subdevices: 8/8
  Subdevice #0: subdevice #0
  Subdevice #1: subdevice #1
  Subdevice #2: subdevice #2
  Subdevice #3: subdevice #3
  Subdevice #4: subdevice #4
  Subdevice #5: subdevice #5
  Subdevice #6: subdevice #6
  Subdevice #7: subdevice #7
card 0: ALSA [bcm2835 ALSA], device 1: bcm2835 ALSA [bcm2835 IEC958/HDMI]
  Subdevices: 1/1
  Subdevice #0: subdevice #0
card 1: hiFace [hiFace], device 0: USB-SPDIF Audio [USB-SPDIF Audio]
  Subdevices: 1/1
  Subdevice #0: subdevice #0
※「hiFace」が表示されればOKです。Raspberry Piのデフォルトサウンドデバイスも一緒に表示されます。
root@raspberrypi:/usr/src/snd-usb-asyncaudio# cp snd-usb-hiface.ko /lib/modules/3.12.35+/kernel/sound/usb/
root@raspberrypi:/usr/src/snd-usb-asyncaudio# depmod -a
※OS起動時に自動でドライバを読ませるために、必ず行ってください。
root@raspberrypi:/usr/src/snd-usb-asyncaudio# reboot
root@raspberrypi:~# aplay -l
**** List of PLAYBACK Hardware Devices ****
card 0: hiFace [hiFace], device 0: USB-SPDIF Audio [USB-SPDIF Audio]
  Subdevices: 1/1
  Subdevice #0: subdevice #0
card 1: ALSA [bcm2835 ALSA], device 0: bcm2835 ALSA [bcm2835 ALSA]
  Subdevices: 8/8
  Subdevice #0: subdevice #0
  Subdevice #1: subdevice #1
  Subdevice #2: subdevice #2
  Subdevice #3: subdevice #3
  Subdevice #4: subdevice #4
  Subdevice #5: subdevice #5
  Subdevice #6: subdevice #6
  Subdevice #7: subdevice #7
card 1: ALSA [bcm2835 ALSA], device 1: bcm2835 ALSA [bcm2835 IEC958/HDMI]
  Subdevices: 1/1
  Subdevice #0: subdevice #0
root@raspberrypi:~# apt-get update
root@raspberrypi:~# apt-get install mpd mpc
※既にインストール済みの場合は、作業不要です。
root@raspberrypi:~# nano /etc/mpd.conf
# For network bind_to_address "localhost"↓# For network #bind_to_address "localhost"
※「An example of an ALSA output:」の項目はすべてコメントアウト(先頭に「#」を付加)します。# # An example of an ALSA output: # audio_output { type "alsa" name "My ALSA Device" device "hw:0,0" # optional format "44100:16:2" # optional mixer_device "default" # optional mixer_control "PCM" # optional mixer_index "0" # optional }↓# # An example of an ALSA output: # #audio_output { # type "alsa" # name "My ALSA Device" # device "hw:0,0" # optional # format "44100:16:2" # optional # mixer_device "default" # optional # mixer_control "PCM" # optional # mixer_index "0" # optional #} # # hiFace output: # audio_output { type "alsa" name "hiFace" device "hw:0,0" }
root@raspberrypi:~# /etc/init.d/mpd restart
[ ok ] Stopping Music Player Daemon: mpd.
[ ok ] Starting Music Player Daemon: mpd.
root@raspberrypi:~# cd /var/lib/mpd/music/
root@raspberrypi:/var/lib/mpd/music# wget http://tascammk.teac.co.jp/audio/dr-05/DR-05_1644_AG_ARP_02.wav
mpdのデータベースをアップデートして、音楽ファイルをプレイリストに登録します。
root@raspberrypi:/var/lib/mpd/music# mpc update
root@raspberrypi:/var/lib/mpd/music# mpc ls|mpc add
音楽ファイルを再生します。
root@raspberrypi:/var/lib/mpd/music# mpc play
無事、音が鳴れば成功です!!